Keeping R Shiny code organized can be a challenge. One method to organize your Shiny UI and Server code is to use a combination of R’s list and source functions. Another method to organize you’re Shiny code is through modularization techniques. Here though, we’re going concentrate on the list and source options.
If you feel comfortable with Shiny and want to get strait to the answer, check out the Solution section. Otherwise, read on!
Outline
Difficulty Organizing Shiny UIs
If you have a Shiny application with a lot of controls, it’s easy to get lost in the braces, parentheses and brackets. Using R’s list() and source() functions, we can make UI code much more manageable by moving components out to other files.
So how do you do it?
To get us started, we are going to work with the starter app provided in R studio. Click File →New →Shiny Web App… . A dialogue box will pop up. My setup details are shown below in the R-Studio dialogue box. Choose a working directory appropriate for you and press Create.
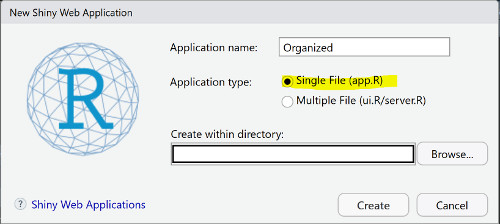
R-Studio will then show the code for the starter Shiny App. The demo code has 4 parts.
- Load the Shiny Library
- Define the UI
- Define the Server
- Run the app.
We are going to start on the UI portion of the Shiny app shown in the screen capture below. This particular UI can be broken down into two parts the “Side Bar Panel” [lines 9-13] and the “Main Panel” [lines 15-17]. What we are going to do is factor out the content in the Side Bar Panel to a file named Side_Panel_CTRL.R and the Main Panel content to a file named Main_Panel_OUTPUT.R.
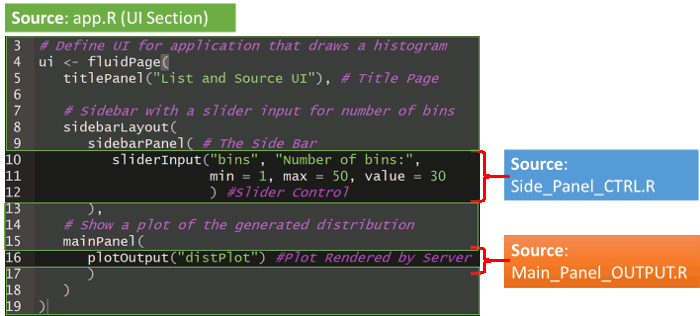
So, make the two new R scripts named Side_Panel_CTRL.R and Main_Panel_OUTPUT.R. From the app.R file, MOVE the sliderInput (lines 10-12 above) to the Side_Panel_Control.R file and the plotOutput (line 16) to the Main_Panel_OUTPUT.R. Make sure these two new files are saved in the same folder as your app.R file.
A UI Source Example that Usually Doesn’t Work
Once you have your files setup, add the source() statements into you app.R file as shown in the code snippet below (lines 8 & 12).
1 2 3 4 5 6 7 8 9 10 11 12 13 14 15 | # Define UI for application that draws a histogram ui <- fluidPage( titlePanel("List and Source UI"), # Title Page # Sidebar with a slider input for number of bins sidebarLayout( sidebarPanel( # The Side Bar source(file = "Side_Panel_CTRL.R", local = T) ), # Show a plot of the generated distribution mainPanel( source(file="Main_Panel_OUTPUT.R", local=T) ) ) ) |
Great your files are setup.
Press the Run App Button in R Studio and the app starts as you might expect. You’ll notice that the word TRUE pops up at the bottom of the slider control and the plot. Not sure why this happens, but you can remove it by adding “[1]” to the end of the source() statement as shown in the screen capture below summarizing where we are right now.
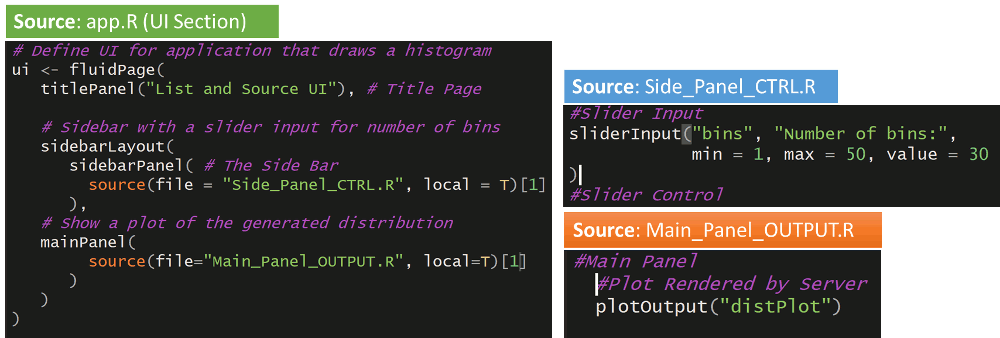
Cool, but this is about as far as you’re going to get with source command alone.
When Source Fails in the UI
The source command alone can fail in the UI sections of a Shiny app. To demonstrate, we are going to add just one additional control to our side panel control file. First, though, let me show you that adding one additional control works when I add it directly to the app.R file in the UI section:
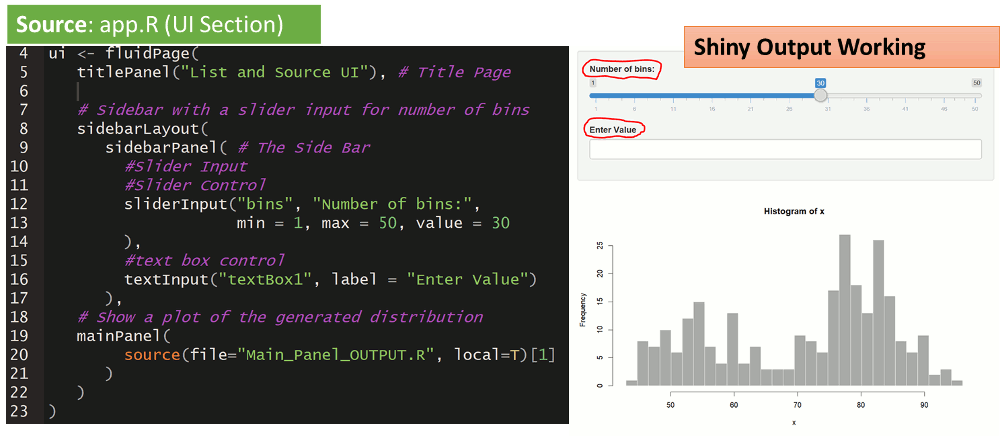
To the right of the code, you can see that the app works. Now let’s see what happens when we move the following control code back to the Side_panel_CTRL.r file.
1 2 3 4 5 6 7 | #Slider Input #Slider Control sliderInput("bins", "Number of bins:", min = 1, max = 50, value = 30 ), #text box control textInput("textBox1", label = "Enter Value") |
OK, moved the code. Here is what the three files should look like and the result of trying to run them.
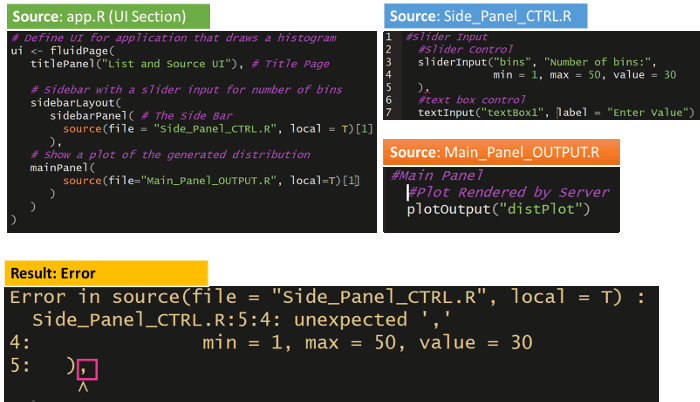
hmm… We had an error, and it seems to involve the syntax of the code we are sourcing… perhaps the comma. How do we fix this?
Solution
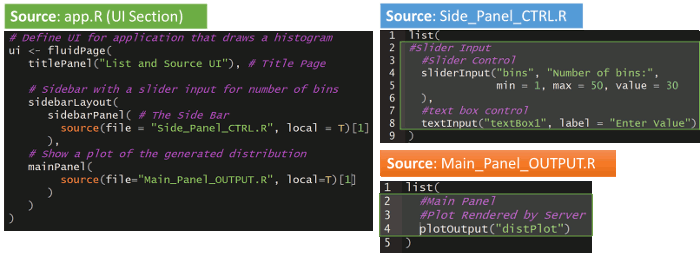
The simple fix is to wrap the code in your UI files with the list command as shown in the following few screen shots: Look specifically at lines 1 and 9 of the Side_Panel_CTRL.r file and 1 and 5 of Main_Panel_OUTPUT.r file.
Usage Note
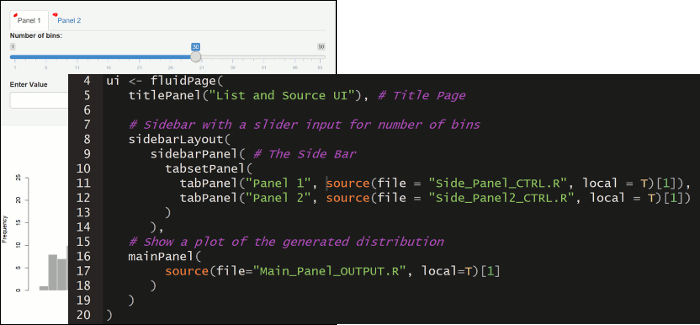
I find the source() and list() combo to be particularly useful when I work with tabbed panels. A quick example is shown below with some tabPanel code on lines 11-12. The controls for these two panels are coded in the source files as described previously.
Organizing the Shiny Server with Source
Server side Shiny is good old fashioned R-code and can be easily sourced from an external file using the source() command without list.
source(
file = “[source file path]”,
local = True #
)
The only trick with server side Shiny is dealing with the reactive elements like “reactive({…})”. For these you need to put the source() command in place of the “…”. To illustrate consider the following two code snippets.
Out-of-the-box sever code looks something like this:
1 2 3 4 5 6 7 8 9 10 | # Define server logic required to draw a histogram server <- function(input, output) { output$distPlot <- renderPlot({ # generate bins based on input$bins from ui.R x <- faithful[, 2] bins <- seq(min(x), max(x), length.out = input$bins + 1) # draw the histogram with the specified number of bins hist(x, breaks = bins, col = 'darkgray', border = 'white') }) } |
If you source out lines 3 through 9 after the output$distPlot assignment to a file called Server_Plot.R, and leave the server code like this:
1 2 3 4 | server <- function(input, output) { output$distPlot <- source(file="Server_Plot.R", local=T) } |
You’ll get an error:
“Error in .subset2(x, “impl”)$defineOutput(name, value, label) :
Unexpected list output for distPlot”
To avoid this error, keep the renderPlot({}) reactive element in the app.R file and source from within like so:
1 2 3 4 5 | server <- function(input, output) { output$distPlot <- renderPlot({ source(file="Server_Plot.R", local=T) }) } |
For the server side, that’s it. You should also notice that compared to the UI side, we did not need to place the “[1]” at the end of the source command.
Summary
Shiny is a great tool for communicating data, but its easy to get lost in the braces, brackets, and parentheses. To help simplify your next Shiny application, try using the source-list combo and don’t forget the “[1]” at the end of the source statement, or you’ll have a while bunch of TRUEs running around. On the server side, we need to be careful around reactive elements.


One Comment
Pingback: